The Farmhouse, Uncategorized

Next up, Guest Bathroom

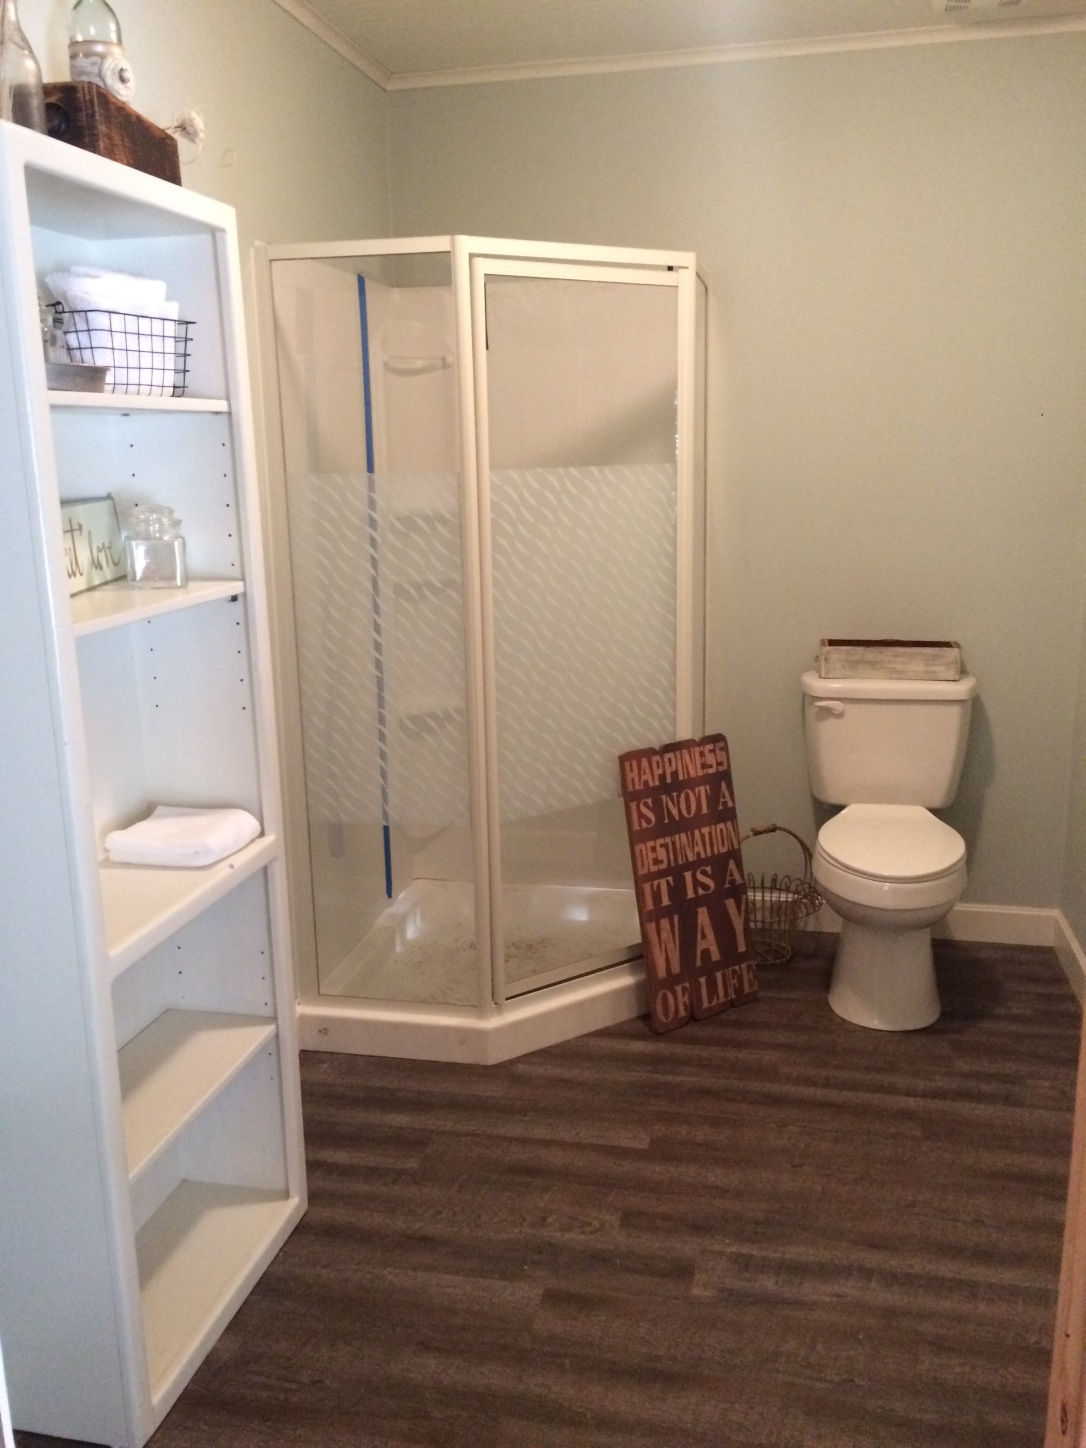
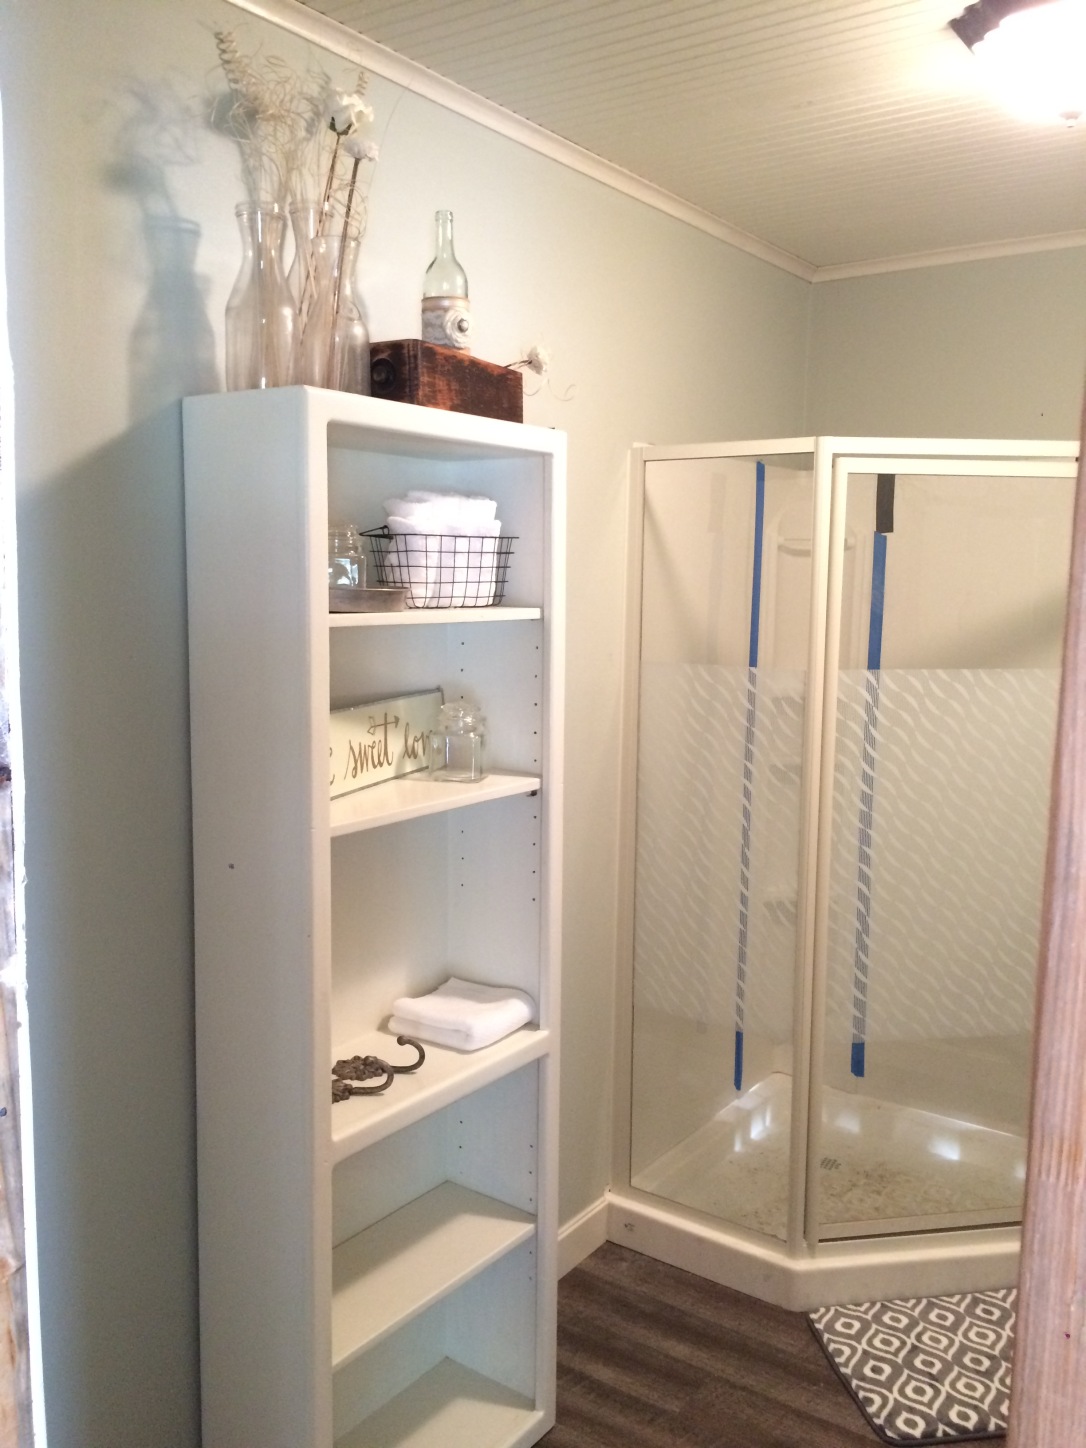
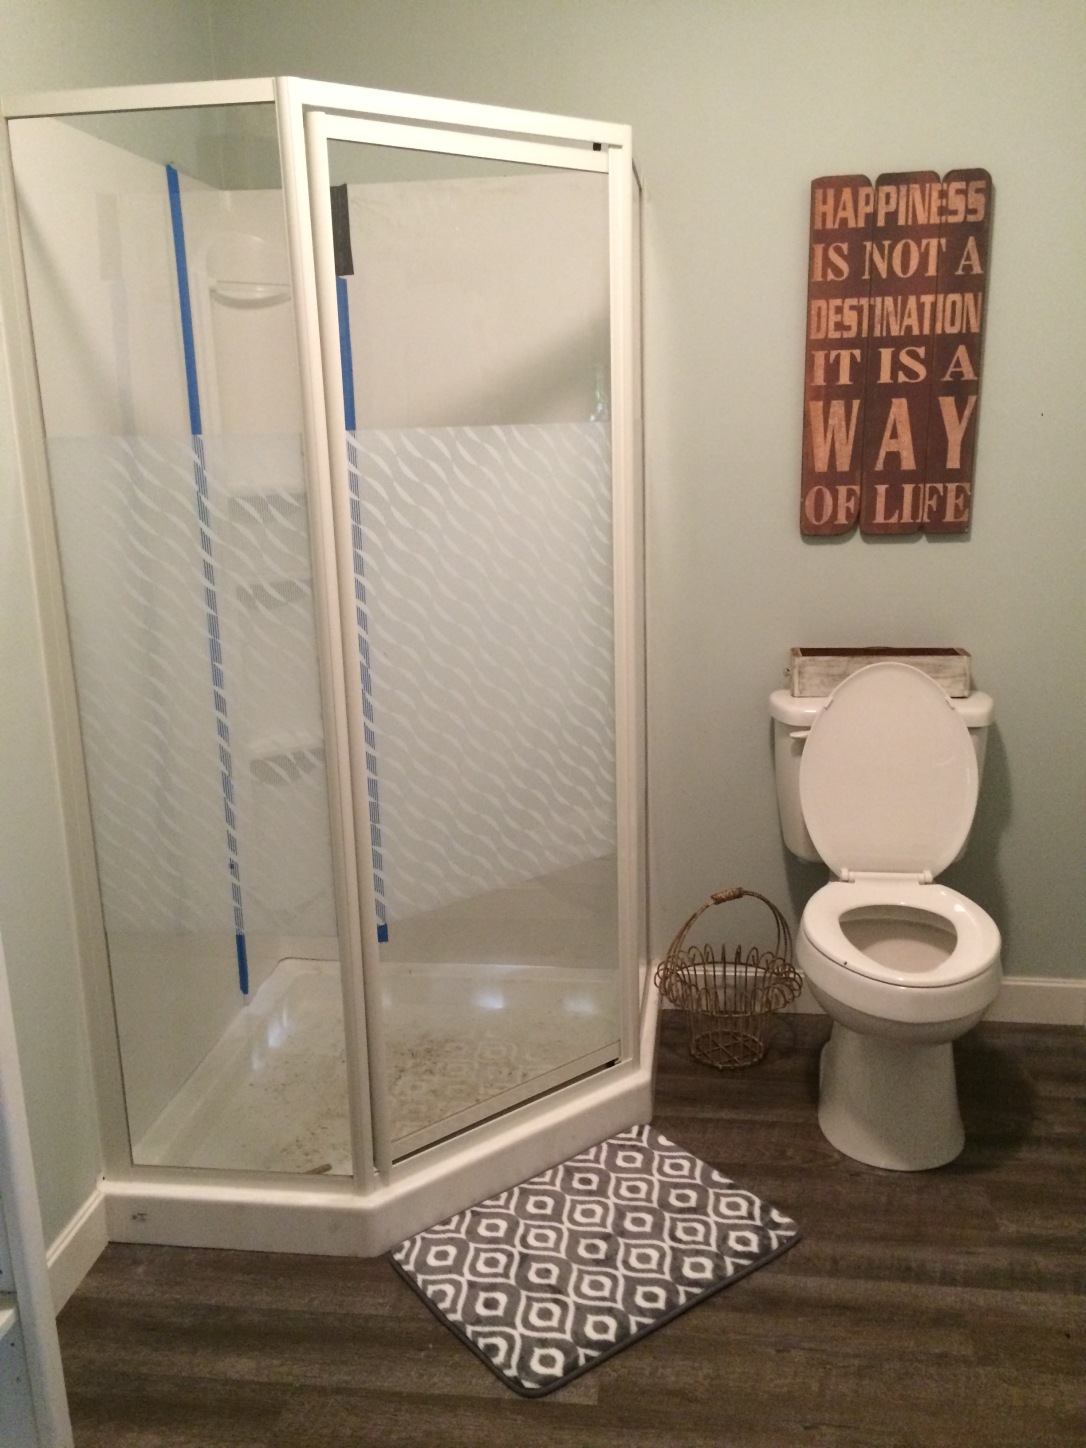
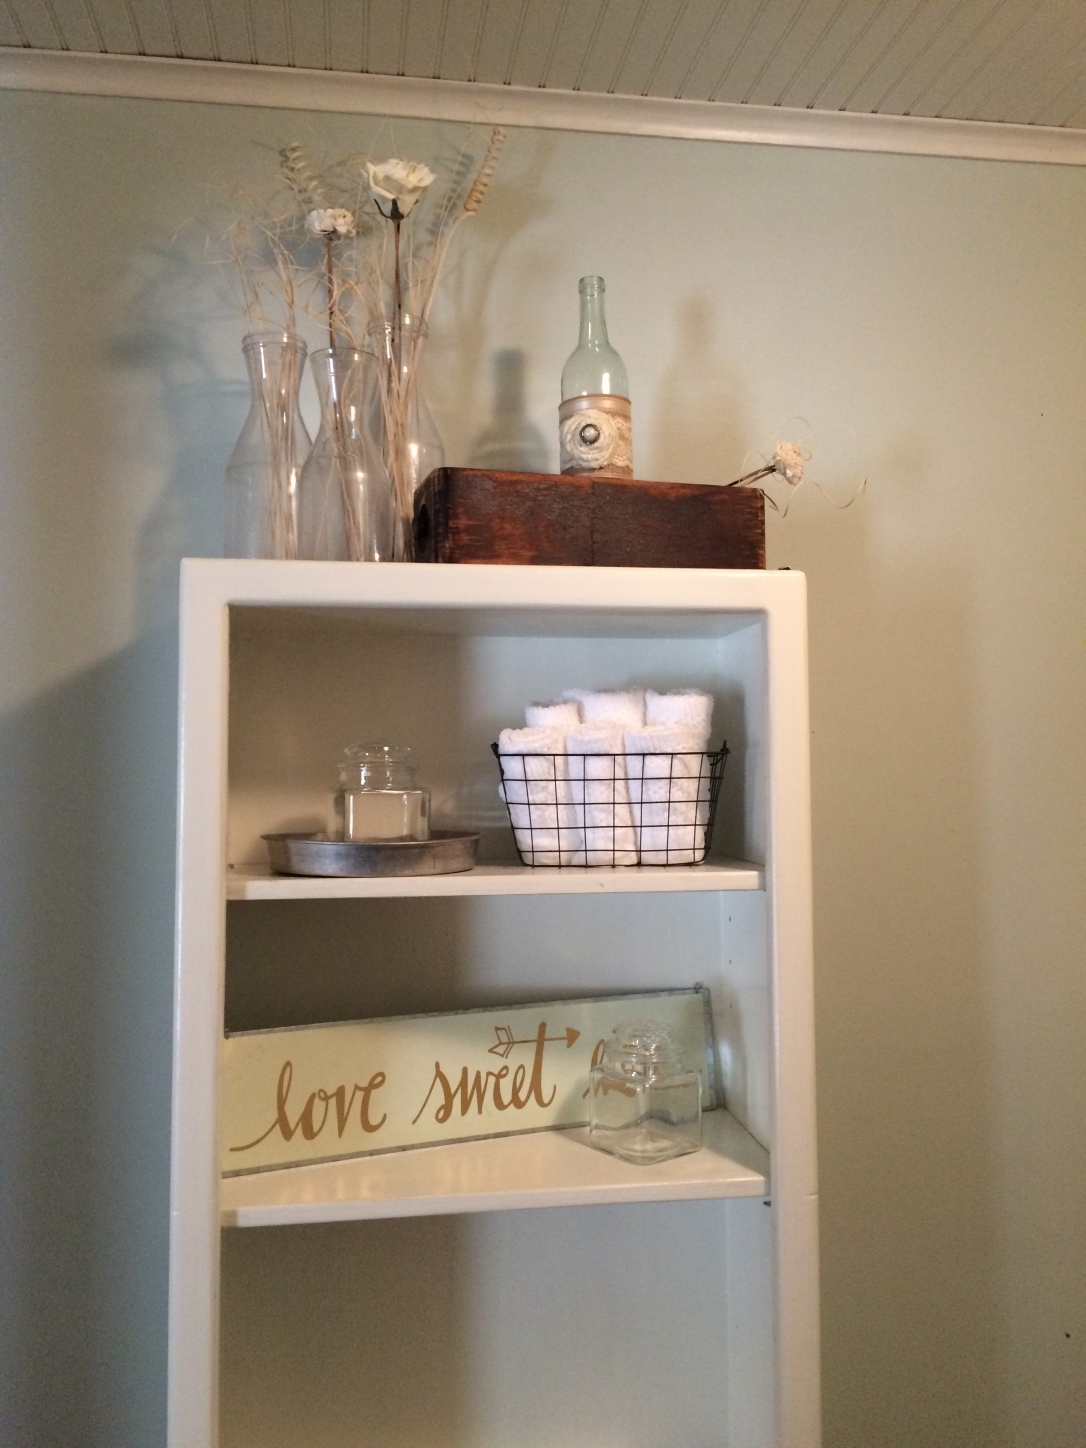
While we have a few things left to do in the utility room we went ahead and got started on the kids/guest bathroom.  This is the smallest room in the house, so the challenge is going to be making it still different and cute.  Because cute is the important thing, am I right ladies?  This room is basically 7×9.  So not a tiny bathroom, but not anything luxurious.  We decided to keep things to a minimum in there to still give it a roomy feel.  We are going with a corner shower, no tub.

We started with the “green rock” – ladies this is mold resistant, water resistant sheet rock. Made for bathrooms. So it came this color, I did not paint it 🙂

image

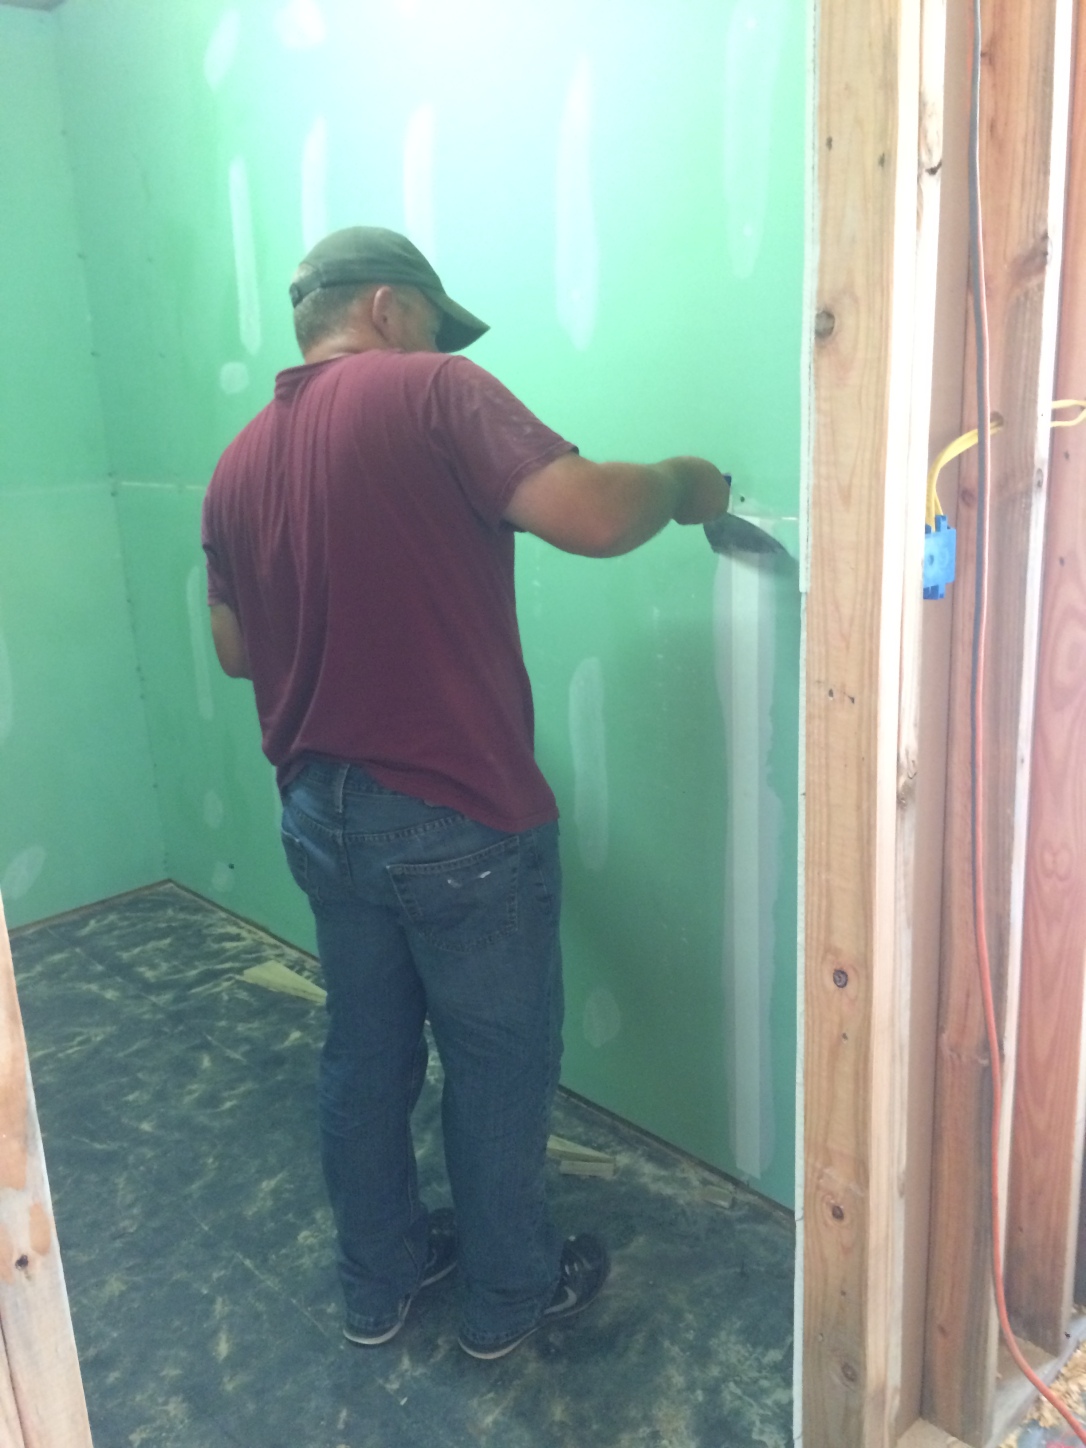
Now one secret about my man.  He can DO anything.  However, he hates plumbing and taping and floating. Especially over his head.  So our next goal was to figure out a ceiling solution (and throughout the whole house we will make this decision) where he wouldn’t have to T&F the ceiling.  We decided on the thick bead board…. I’m in love!

image

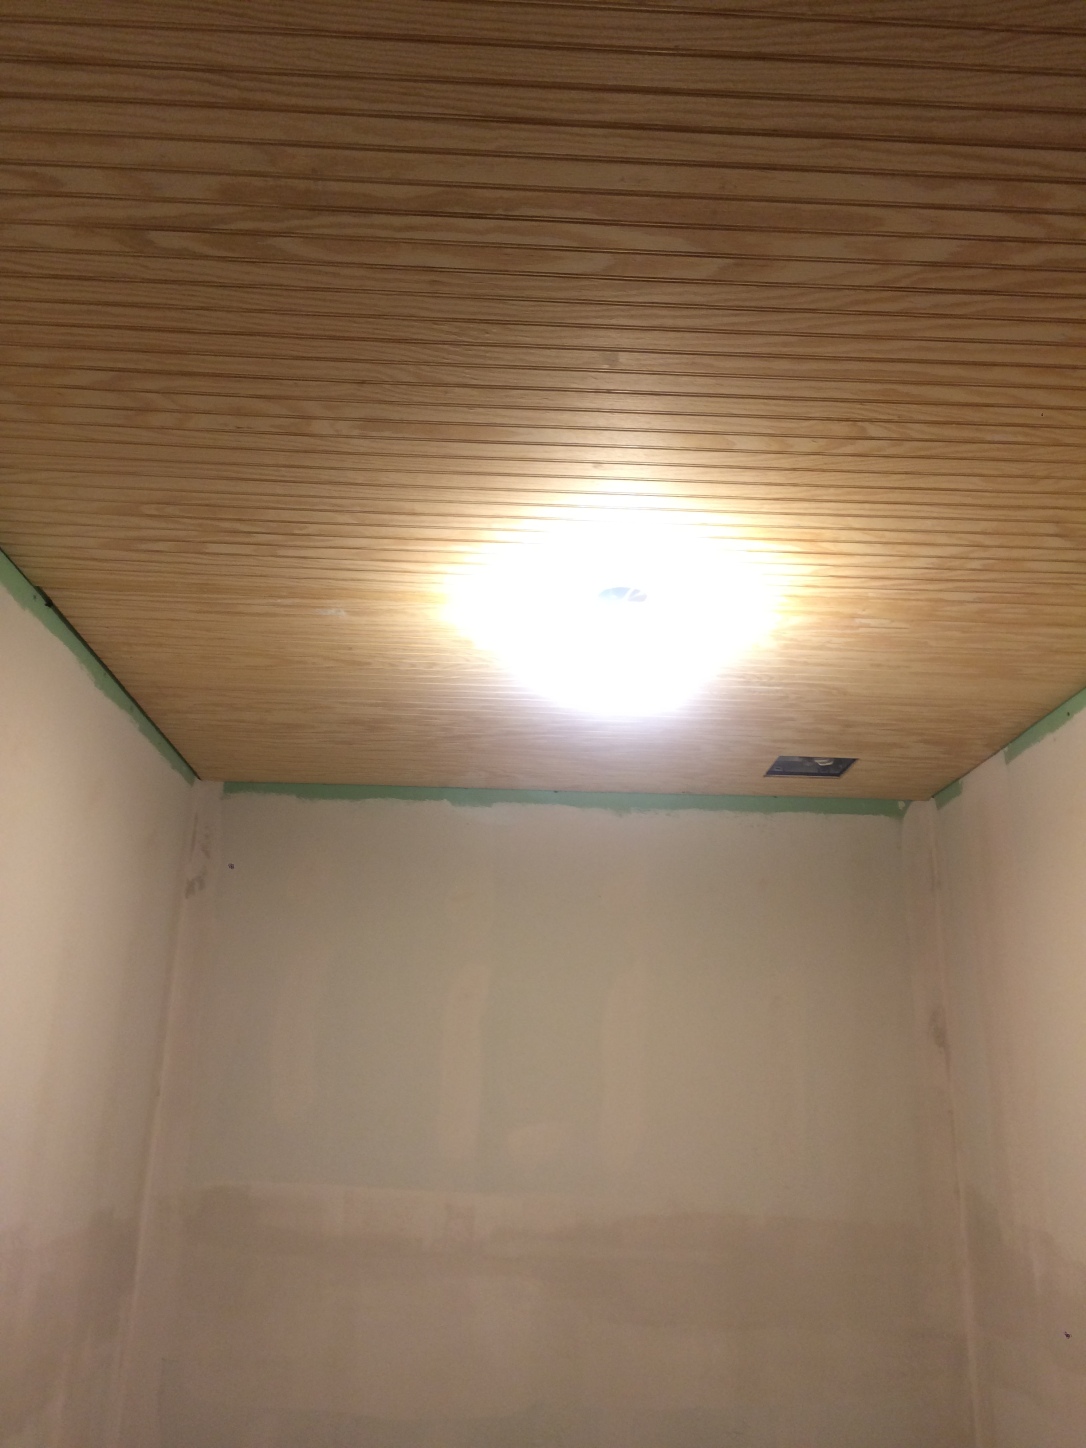
Here it it painted Dove White by BM. I’m going to be using that color everywhere I have a feeling.  Then painted the walls Sea Salt by Sherwin Williams.  A color I saw on pinterest and had to try it somewhere.  This picture does not do it justice.  It’s a gray, with a hint of beachy blue/green to it.  So soft and relaxing.

Then we put the flooring down.  Now here’s how house building with the Strong’s goes:

M:You need to decide what flooring you want in the bathroom that’s next.

D: Ok, hmmm (looking online for ideas and pricing) I love this! Heck no I’m not paying that much….. Hmmm this is ok, I might could live with that…. I don’t know…. Uggghhh

M: OK let’s run to Lowes. OK we are not leaving here without flooring so pick something you like.

D: OMG I love this one and it’s on sale! I’ll take it!

Then we get home and love it and that’s that…. So here is what we got.  It’s vinyl planks, because our kids keep the floor wet, laminate or real wood would not have worked. And being on pier and beam, ceramic tile might crack later. So vinyl it was.

And once again, we measured exactly and held our breath as we had part of one piece leftover.  Wasteful we are not!

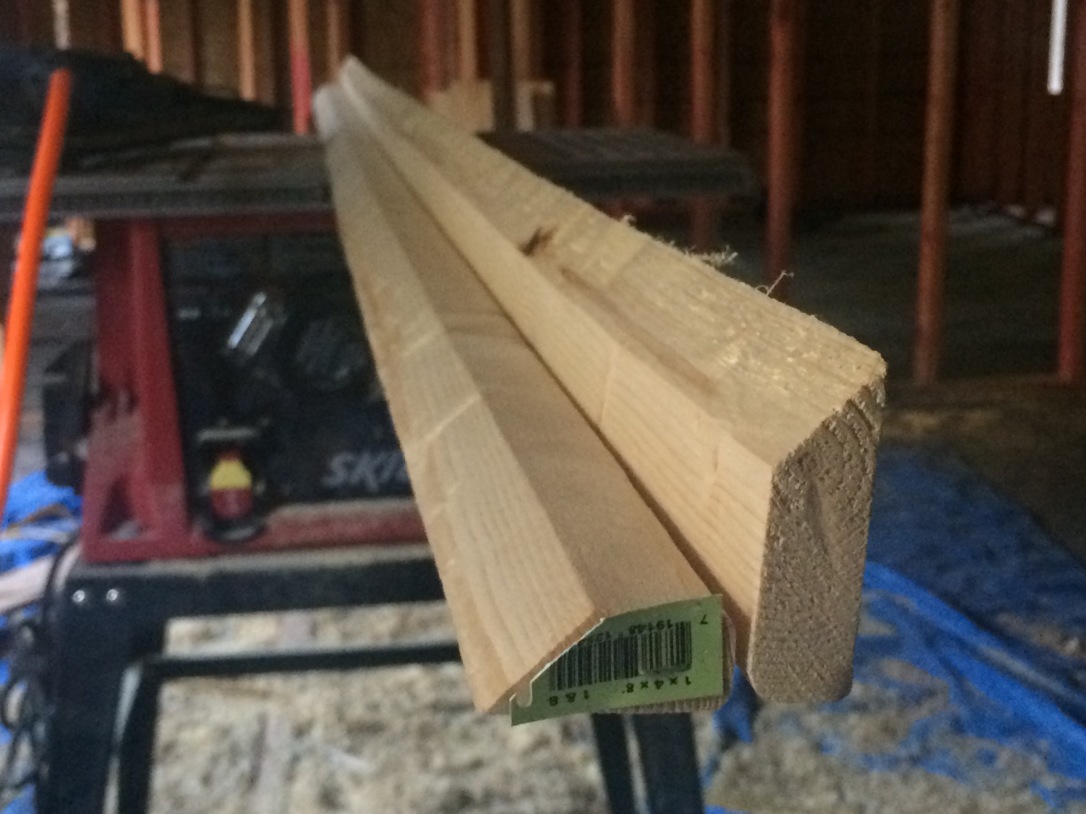
Next up, beautiful mahogany trim and baseboard that we got FREE, cha ching! Love it when we have free stuff. This stuff came from an old construction site and was just going to be thrown away! Can you imagine??? The horrors that go on around here! One mans trash is another mans treasure….

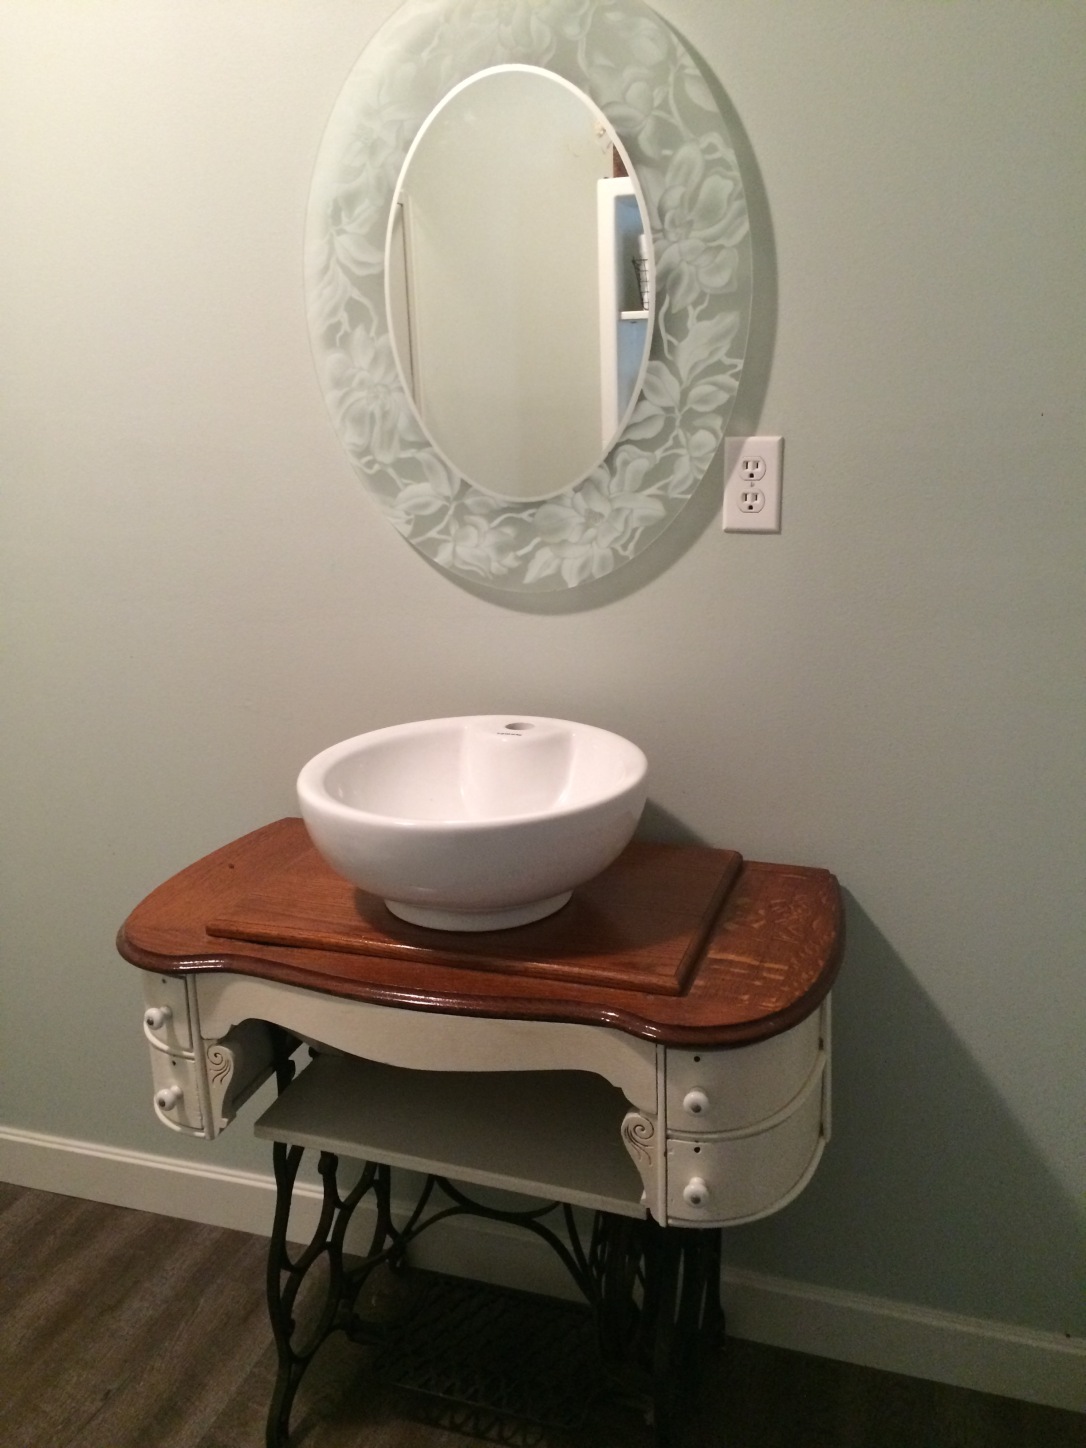
And my favorite part.  I traded my mom a gorgeous rounded, unique loveseat for this old sewing machine table.  Stripped it down and painted and stained it an WOW, isn’t it the cutest vanity you’ve ever seen??

image

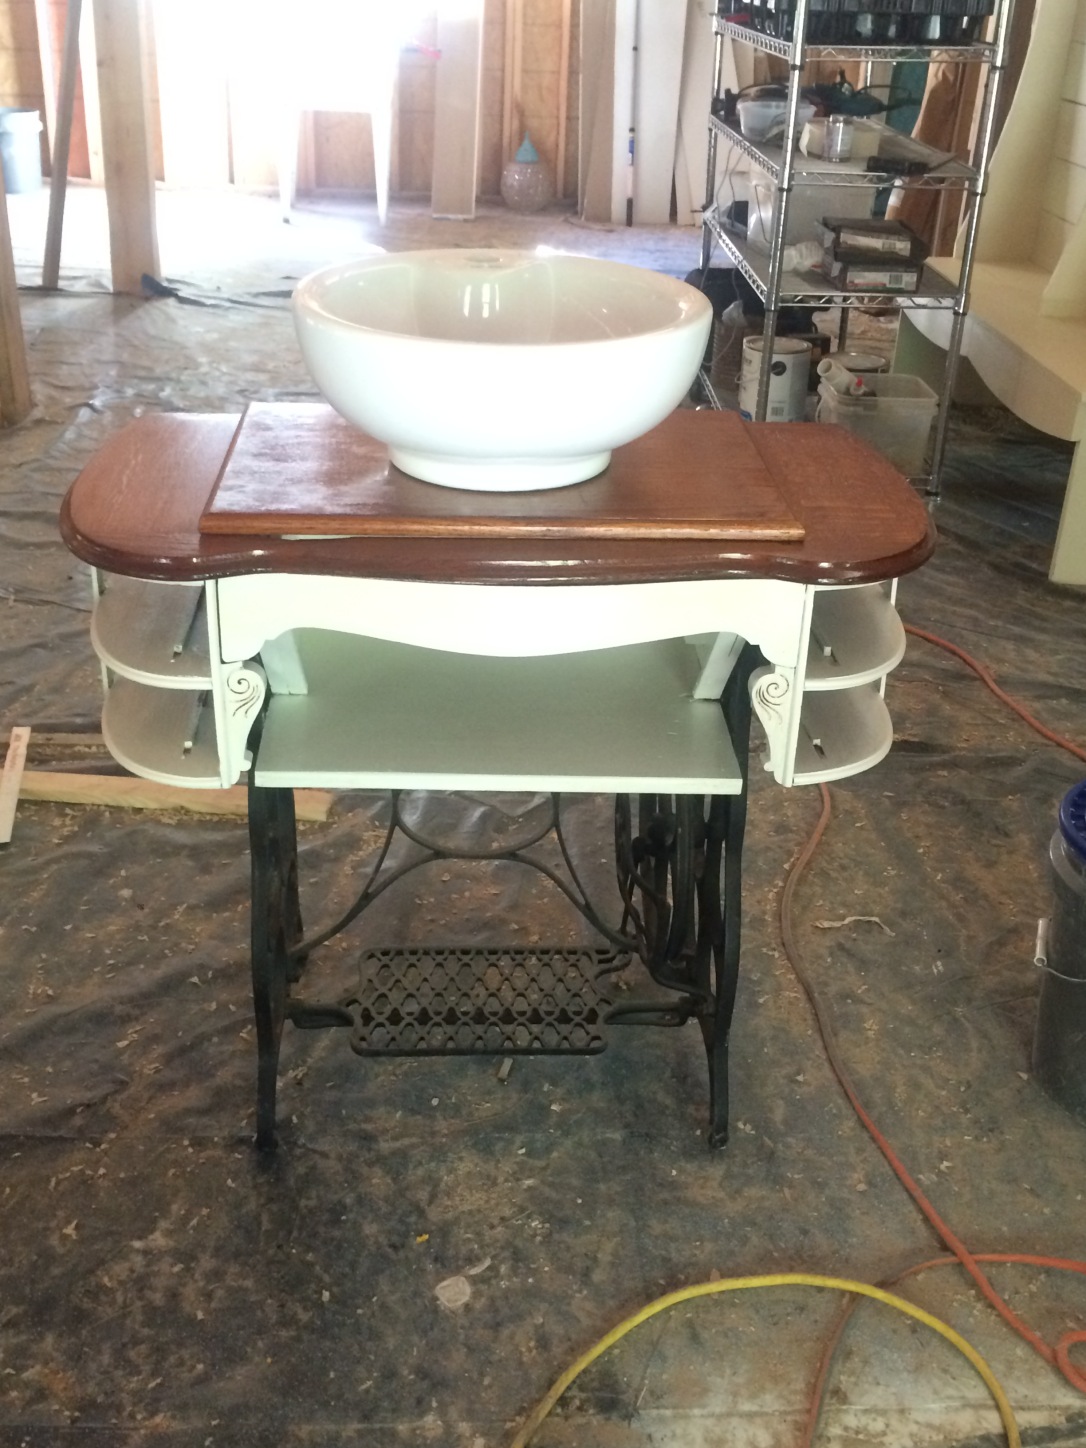
By the way. I got this sink combo with faucet included for $88 on ebay! Score!

We wanted to save room by just putting in a corner shower since the kids are teens and rarely ever take a bath, they can use the master jacuzzi once in a while if they need to soak.  We agreed that this wasn’t our first choice in the looks department, but the price from Surplus Warehouse fit our budget needs at this moment, so it had to work. Here my man, my cousin Tony and father in law Alvin are installing while I try to stay out of their way.

After they finished and left, they hubby and I installed the toilet.  As soon as he scooted out, I couldn’t help myself but to get in there and decorate and put the vanity and shelves in. The water is not ran in there yet, but it looks good, am I right? As long as I can get pictures to share, I don’t mind waiting a few more days for it to be plumbed.  We still have to get a hot water heater though. But I can see long hot showers in our future, which I know we are all ready for! One where you can wash your hair and shave your legs on the same night before the hot water runs out 😉

imageimageimageimageimageimage

The Farmhouse, Uncategorized

Laundry/Pantry Update

So we finally got the pantry shelves installed.  We wanted to do the pipe and flanges style shelves. After looking at Lowes for the materials I thought we might have to back up and punt.  The hardware alone for the 5 shelves was going to be around $200! I’m so frugal and the funnest part of this challenge is to see if we can beat our budget of $30,000 to build this entire house. So we save and barter and bargain shop and dumpster dive for whatever we can to keep that bottom line down.  We still haven’t reached the mark where we would still be saving for the concrete if we had gone with slab!

We scored the 1/2″ pipe for free, borrowed a hand pipe threader and threaded all the pipe ourselves. The flanges were $5-7 EACH at Lowes, I scored them for $2.50 each on eBay. Woohoo! And we got the end caps at Lowes since they were cheap. A bottle of primer and spray paint and some 1×10’s we had on hand, and our pantry shelves for $60!

Can’t wait to get all my baskets and jars and canned goods up there!

The Farmhouse, Uncategorized

Dried in and moving along

I can’t believe I haven’t updated the blog since March.  It’s too easy to post pictures immediately on Facebook and Instagram.  I have to remind myself I need to update the blog to have a complete picture of our dream when we finish.  But even more unbelievable is how much we’ve gotten done since the last update!

Not only are we dried in (well except for the doors and windows) but we are actually doing laundry and in a few short days will be able to shower in the new house.

If you’re just joining us, our goal is to completely finish one room at a time.  Now,  we found out that sometimes we get stuck either on money or decision making or something, and we go ahead and start on the next room as materials and money are available.  So the laundry room/pantry is usuable now but not quite completely finished.

Here’s our progress from April and May:

Those two holes in the middle will be matching french doors.  The window on the right is Ashton’s bedroom and the left window is the master closet.  It all had to balance for the OCD man of the house 😉

image

Since we don’t have contractors to get upset and are not working from blueprints, we decided that the kitchen walls were too tall and would just look strange above the cabinets and shelves.  So we just threw in a loft 🙂  We still get 9 ft ceilings in the kitchen area and will get an open loft for one of the kids to sleep or later on for grandkids to play.  We will also put our computer and office space up there.  It will have open railing banister.  Not sure what we will make it from yet.  Maybe rebar? We will figure that out when the time comes.

image

Those rafters and boards will stay exposed.  They will be White Dove by Benjamin Moore.  We thought about staining but don’t want the dark cabin feeling. We want a fresh, light, farmhouse feel. That is my kitchen you are looking into above. The sink (remember the old farmhouse sink from a previous post??) will go in front of that window.

Next we started on the utility room. Because 15 months doing laundry at the laundrymat twice a week was starting to get old and expensive. So here we go:

I new I wanted a laundry room that was cute, fun and different.  I was drooling over the metal tiles from old hotels.  Looking at Lowes, the tiles were $20+ PER PIECE!  I knew our budget didn’t allow that so I started looking online.  I found http://antiqueceilings.com/ – and WOW! Not only was it SO much cheaper (like $2.50-$4.50 per piece depending on your taste) but fast delivery and excellent customer service.  So we ran some lads (lats??), I don’t know…. thin strips of wood…. across the ceiling and put thin sheetrock up.

image  No need to tape and float because the tiles are installed with adhesive and stick instantly!  Michael calls them our take out box tiles.  I call them beautiful!  Seriously though, they do feel like a take out box.  They are very fragile, fingernails can dent them, but man once you get them up there it’s amazing!

image

And that chandelier has been following me around, move to move, for about 10 years.  I found it somewhere for like $10.  I knew it would have a special role in it’s lovely life somewhere, and with a little scrubbing and some spray paint, voila!

Next up was to find the perfect paint color.  Michael used to hate my paint chips. I would grab hundreds of cards of varying shades of the same color.  He would cringe and lead me away from the paint aisle every time we would go to Lowes, which is basically a weekly date. So I got smart and bought one of those cute little Benjamin Moore books that have tons of samples in it.  I found the perfect turquoise that wouldn’t be so bright and trashy, it actually is a Valspar color, Gypsy Blue. It matched the wallpaper I picked out, more on that story later, and the chandelier so I got it.

If you’ll check out that “crown moulding” that he is installing, we made an amazing discovery.  You can actually buy strips of wainscotting that is tongue and groove for like $15 for a pack of 6 8ft pieces.  If you take them apart they make great baseboard and crown! We had to build a little contraption to make it fit just right because of the gap in our flooring. But my man is a genius and figured it out.

image

He built this little piece to go along the edges and nail the trim to!

Oh and did you see my floors above? I love it.  It’s laminate or hardwood, I will never understand, to me, hardwood is WOOD, not snap together pieces.  But anyways, when we calculated the square footage of the room it came out to be EXACTLY 7 boxes of the stuff.  We ordered the 7 boxes and prayed it would work out.  We had part of one piece left over! It was a miracle!  BTW if you are curious, it is Frosted Maple by Allen+Roth from Lowes.

Now the wallpaper story – do you know how hard it is to find wallpaper in a store these days??? Nearly impossible.  So I went online, seeing what I wanted in my head. Not being able to find it in my price range.  Even the cheap wallpaper is expensive!  But I found one that I thought “would do”. It looked more green than I wanted but oh well.  Well it arrived and I was thrilled that it was the exact color I wanted.  Michael wasn’t thrilled with the pattern and bet me $20 that in a year I would be tearing it down.

He was anxious about hanging the wallpaper. I think he doubted my skills, because I don’t have “that” many skills LOL but once we got it on the wall he admitted that he did in fact like the wallpaper 🙂  We are putting pantry shelves on the wallpaper area soon.

Every laundry room (that leads to outside anyways) need a mudroom bench and I was drooling over the ones on pinterest.  I came home one day and Michael had made me one from scraps we had laying around. I guess he didn’t want a nap that day and felt like working 🙂  He came up with this beauty!

I got the hardware from eBay and decorated it with some treasure from both our our grandparents and some items from our wedding.  It’s perfect!

Then we got the washer and dryer hooked up and running (I swear we heard angels singing as we all, including the kids, watched the first load go in):

image

Then all that was left was the folding table.  Again from scraps we had laying around.  I swear this man is a genius! Genius I tell you!

Now all that left is to put up the shelves, build a shelf over washer & dryer and install the sink beside the washer. I’ll post the finished picture as soon as we finish it!

And that’s the story of how the laundry/pantry was completed.  Stay tuned for the bathroom update.